On September 27, as part of their security enhancements, Zoom will be making changes to their terminology and to Zoom meeting settings that will affect previously scheduled meetings as well as future meetings. UD Information Technologies (UDIT) will be adjusting some of these settings on a campus-wide basis as detailed below.
- Passwords and passcodes. Passwords now refer to your sign in information. Passcodes are used for entry into meetings.
- All meetings, including personal meeting rooms, previously scheduled individual and recurring meetings, and any meeting scheduled in the future that do not have a passcode will have the waiting room feature enabled automatically.
- Your existing meetings that use the Waiting Room will now automatically allow UD authenticated users to skip the Waiting Room and be admitted immediately.
- You can change this setting to force all participants into the waiting room before joining the meeting.
- Waiting Room notifications. The meeting host will now receive a visual and auditory notification that an attendee has entered the Waiting Room.
Table of Contents:
- Using Waiting Room in Zoom
- Customizing Waiting Room in Zoom
- Using the Zoom Waiting Room
- Frequently Asked Questions (FAQ) about Waiting Room and Passcodes
Using Waiting Room in Zoom
To enable Waiting Room in your Zoom Meeting:
- Sign in to the Zoom web portal.
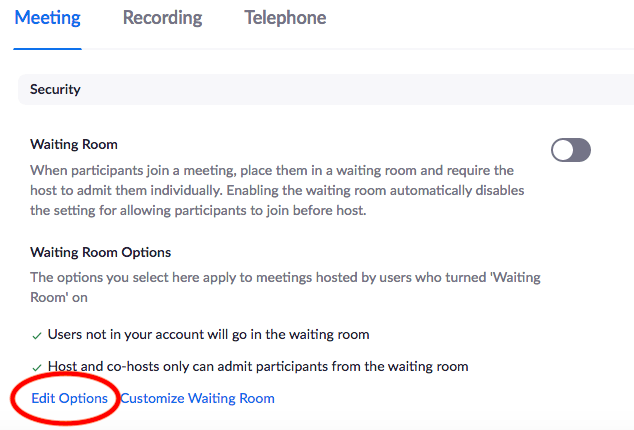
- In the navigation menu, click Settings.
- Under the Security section, verify the Waiting Room feature is enabled.
- Notes:
- If the setting is disabled, click the status toggle to enable it. If a verification dialog displays, choose Turn On to verify the change.
- If the option is grayed out, it has been locked at either the group or account level, and you will need to contact your Zoom administrator.
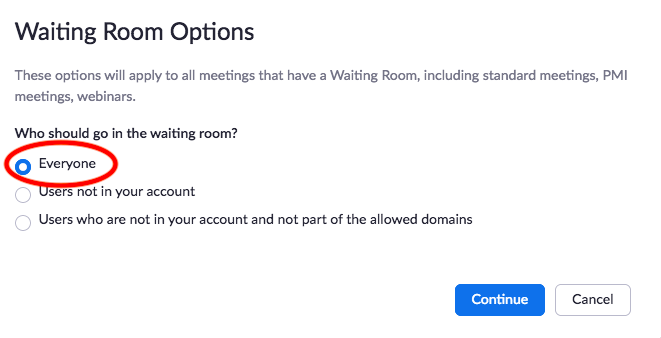
- Click Edit Options to select who you want to admit to the Waiting Room.
- Everyone: All participants joining your meeting will be admitted to the Waiting Room.
- Users not in your account: Only participants who are not on your Zoom account or are not logged in will be admitted to the Waiting Room. If not logged in, they will have an option to log in.
- Users who are not in your account and not part of the allowed domains: Users who are on your account or signed in to a Zoom account at the domains you list will bypass the Waiting Room. After selecting this option, enter the domain(s) here, separating multiple domains by a comma.
Note: If Users not in your account or Users who are not in your account and not part of the allowed domains is selected, you can allow those users who bypassed the Waiting Room to admit participants if the host is not in the meeting.
Customizing Waiting Room in Zoom
You can customize the Waiting Room title, logo, and description at an account, group, or user level.
Note: You will need to enable Waiting Room before you have the option to customize it.
- After enabling Waiting Room, navigate to the Security section.
- Click the pencil icon below the Waiting Room option.

This will open the Waiting Room customization options.

- Title: Click the pencil next to Please wait, the meeting host will let you in soon. to update the meeting title. Click the check mark (✓) when you are done.
Note: Titles are limited to 64 characters. - Logo: Click the pencil icon to upload a logo.
Note: Logos can be in GIF, JPG or PNG format. They cannot exceed 1MB. The minimum height and width is 60px and the maximum is 400px. - Description: Click Add waiting room description to add a description to the Waiting Room. Click ✓ when you are done.
Note: The description is limited to 400 characters.
- Title: Click the pencil next to Please wait, the meeting host will let you in soon. to update the meeting title. Click the check mark (✓) when you are done.
- Click Close when you are done.
- Participants will see your custom Waiting Room branding when they join the meeting.
Using Zoom Waiting Room
To learn how to use Zoom Waiting Room in the Zoom Application, please see Zoom’s guide for your particular operating system or platform.
Frequently Asked Questions
Starting September 27, Zoom will require that all meetings have a Passcode or a Waiting Room enabled for all paid accounts. You’re in control of your meeting security selections, and we have designed the options with security and ease of use in mind.
What are Waiting Rooms and how do they work?
The Waiting Room feature allows the host to control when a participant joins the meeting by placing participants in a Waiting Room prior to joining the session.
What is the difference between a Password and a Passcode?
As part of this change, we are making the distinction of calling the codes that are unique to your meetings “Passcodes” and will no longer be referring to them as “Passwords.” Passcodes are meant to be shared with your invited meeting participants along with the meeting ID for access.
“Passwords” will refer to your Zoom account login credentials. Best practice security guidelines tell users to never share passwords.
What if I don’t have a Waiting Room or Passcode enabled by September 27?
If neither is enabled, Zoom will enable a Waiting Room for your meetings.
If I already have a Passcode or Waiting Room enabled, will anything change?
No, your settings will remain the same for your current selection. You or your administrator can change your security preference at any time.
How will this affect my calendar invitations when scheduling meetings?
If you already have a Passcode or Waiting Room on, there will be no change to how you schedule meetings.
If Passcodes are added to existing meetings, calendar invites need to be resent to include the Passcode. Enabling Waiting Room for new or existing meetings does not affect calendar invitations.
How do I enable Waiting Rooms or Passcodes in my meeting?
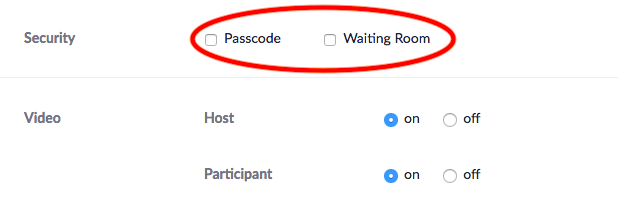
Check the appropriate box when scheduling the meeting.
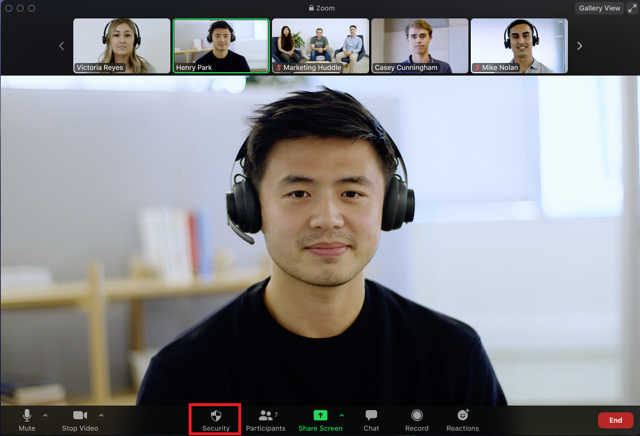
You can also turn on the Waiting Room during a running meeting through the Security icon in the toolbar.
How do I set up my meetings to force all users into the Waiting Room (even UD Authenticated Users)?
Change your account Settings in the Waiting Room section from “Users not in your account” to Everyone.


Can I have different Waiting Room Options for different meetings?
No, you can only have one Waiting Room Option for your entire account which affects all of your meetings. If you must adjust Waiting Room Options on a per meeting basis, you can change the account level setting before each of your meetings.
If you choose to not use a Waiting Room on your meeting, you can instead use a Passcode.
Can I embed the Meeting Passcode into the Meeting Link/URL?
Yes, you can embed the Passcode by visiting your UD Zoom Settings tand urn on the Embed passcode in the invite link for one-click join setting.

How will Passcodes affect participants joining the meeting by phone?
Your security selection for meetings will not affect phone Passcode requirements unless you select “Require a Passcode when joining by phone.”
How will Waiting Rooms affect participants joining the meeting by phone?
For meetings with Waiting Rooms, participants will dial in as they normally do. They will hear a prompt that they are in the Waiting Room and the host will have to admit them.
How will Waiting Rooms affect the host joining the meeting by phone?
If the meeting has Waiting Rooms enabled and ‘join before host’ is disabled, then the host will be able to start the meeting and disable the Waiting Room by entering their host key (found on the profile page). The host will hear audio prompts indicating that the Waiting Room has been disabled, all attendees will be admitted, and they can lock or unlock the meeting by pressing * 5.
