“Your connection is unstable” – at one time or another you’ve likely seen this message pop up during a Zoom meeting. If so, you may need to reduce your data and bandwidth use in order to optimize your Zoom experience, or to stay under your network’s data cap.
Here are some strategies you should try to reduce your bandwidth and data usage during Zoom meetings:
Contents
- Turn off other apps or devices that could be draining the bandwidth
- If you don’t need video, turn it off
- Only screen share as long as you need to
- Mute your audio when not speaking
- Record meetings to the cloud
- Connect directly to the router
- Reset the router
- Restart the Zoom app or your computer
- Purchase a more powerful WiFi router or extender
- Contact your ISP for more information
Turn off other apps or devices that could be draining the bandwidth
It’s always best practice to avoid running other data-intensive applications during Zoom sessions, such as streaming video or music, uploading/downloading large files, or visiting websites with dynamic content. These applications may be hogging a large share of your bandwidth; by not running them during meetings, you can improve your overall Zoom client performance.
To pinpoint which programs are consuming the most data, check your network usage with Activity Monitor on Mac or Task Manager in Windows.
You should also limit high-bandwidth activities by others on your network, especially during meetings as this will affect the bandwidth available for your Zoom session.
If you don’t need video, turn it off
Turning your meeting video off is the easiest way to reduce the amount of data you’re using. You can adjust your Zoom settings so you always join meetings with your camera off, and you can choose to have attendees’ cameras off for meetings you set up. It’s just a simple click of a button to turn the video back on during a meeting if you need it.
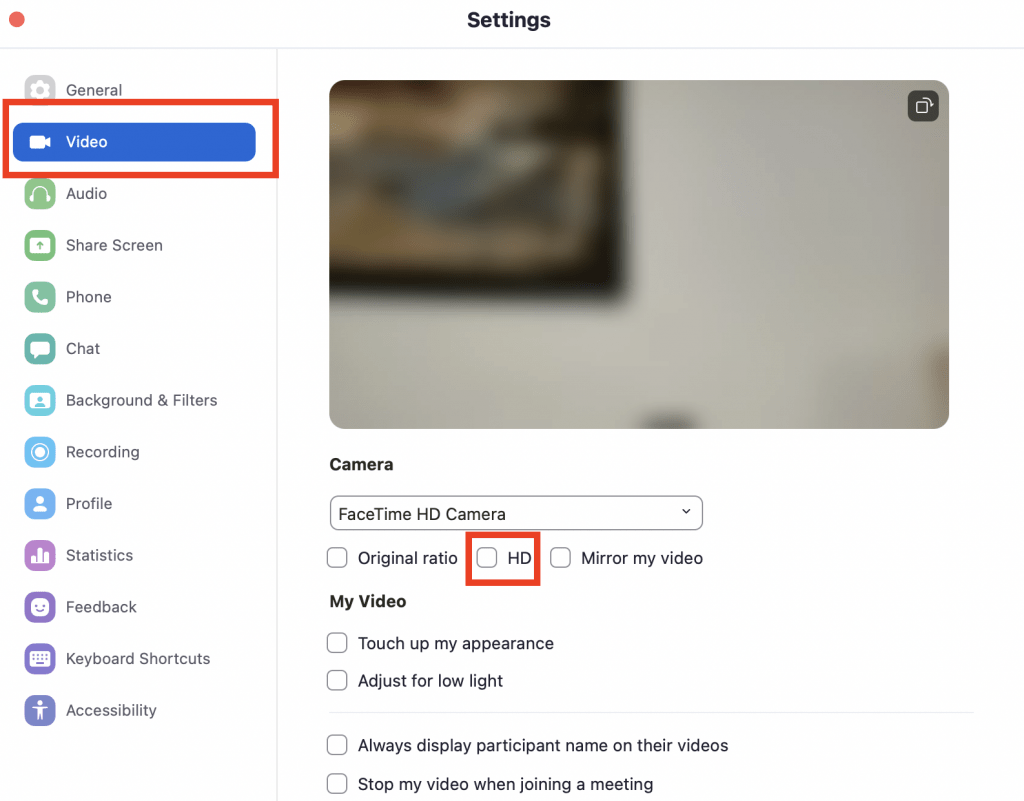
Turning off HD video in settings
Providing video in HD resolution requires significantly more data, so consider turning it off when image quality isn’t critical.
To turn off HD Video in Zoom from the Client Software:
- Click Settings (the gear icon).
- Click Video in the left-hand menu.
- In the My Video section, uncheck the box next to Enable HD.

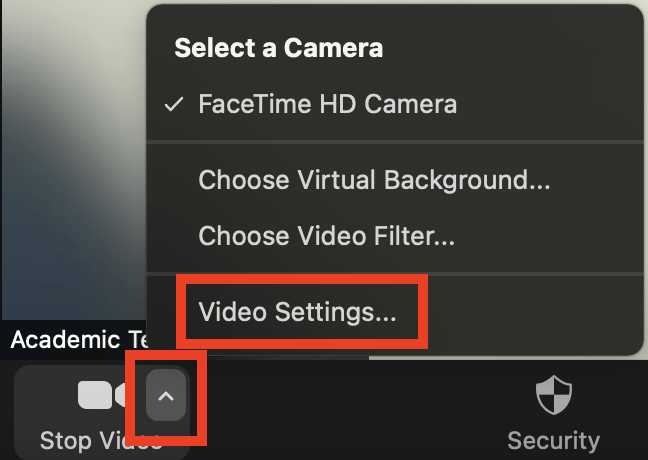
To turn off HD Video in Zoom during a meeting:
- Click the up arrow to the right of the video icon in the toolbar.
- Click Video Settings.
- Uncheck the box for HD.

New feature: Stop incoming video
Users in a meeting can easily disable all incoming video through in-meeting controls. This feature helps to preserve bandwidth for shared content, and to avoid mental fatigue from viewing multiple active video participants. This will only affect your view of the meeting, while others are unaffected and unaware.
- Start or join a meeting.
- Click View
 in the top-right corner, and then click Stop Incoming Video.
 - To resume videos, click View
 again and select Start Incoming Video.
Be sure to stop screen sharing when you are done presenting. Also, request that other attendees do the same.
Or, rather than screen sharing, consider using online collaborative documents, such as Google Docs. This uses less data than streaming video while still allowing everyone to see changes in real time.
Mute your audio when not speaking
While it doesn’t use as much bandwidth as your video, muting your audio when you’re not speaking can also reduce your bandwidth somewhat. Use the “Mute” button at the bottom left corner of the Zoom toolbar to turn your audio off and on.
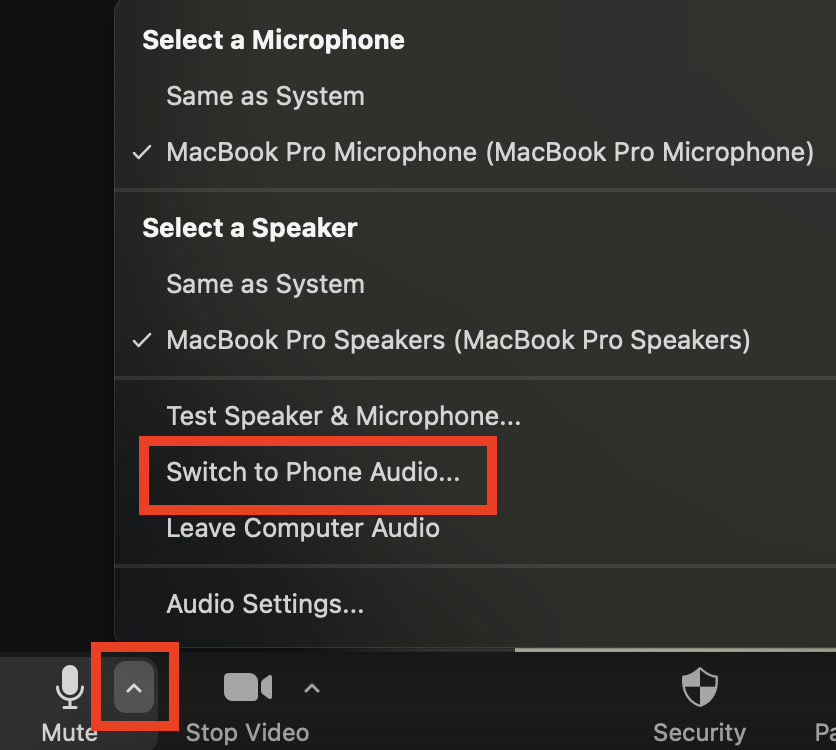
If your connection is unstable, consider connecting to the meeting audio by phone instead of using the computer audio within the meeting. You can find the phone number for your Zoom session in the meeting invitation under “Dial by your location.” It is also available during a meeting by clicking the up arrow next to the “Mute” button and choosing “Switch to Phone Audio”.

Record meetings to the cloud
When you record Zoom meetings to the cloud, your recording will also be automatically added to your My Media in Canvas and in UD Capture Space. Cloud recordings are directly transferred to the cloud so they do not need to be uploaded from your computer, hence saving you data. Learn how to activate Zoom Integration with UD Capture and My Media.
Connect directly to the router
If you’re having connectivity issues, try using an ethernet cable to connect directly to the router. This ensures that your device is getting the strongest possible WiFi signal from your router.
You can also try moving closer to the router. The closer you are to the router, the stronger the WiFi signal your device will pick up.
Reset the router
It’s the oldest trick in the book, but it often works. If your router is acting haywire, try resetting it, or unplugging it to turn it off and back on.
Restart the Zoom app or your computer
Run a test meeting beforehand to see if your connection is stable. If not, try restarting the Zoom app to restore connectivity. If that doesn’t work, restarting your computer isn’t a bad idea either.
Purchase a more powerful WiFi router or extender
If you have an outdated WiFi router, consider upgrading, or try using a WiFi booster or extender to spread your signal farther in your home.
Mesh routers are quickly becoming the ideal option for working remotely. With multiple devices spread throughout your home, a mesh router can transmit a strong signal from room to room, all on the same network (or two networks, if you’re splitting the 2.4 and 5GHz bands into separate connections).
Contact your ISP for more information
If all of the above doesn’t work, you should contact your Internet service provider (ISP) right away to discuss troubleshooting your internet speed or changing or upgrading your internet plan. Most home internet packages are at least 25Mbps downstream/5Mbps upstream, and yours should be at least 10Mbps down/5Mbps up in order to use Zoom effectively. Your ISP can also replace your router with a newer model to help improve connection speeds.
