
Instructor presence is an important component for successful student engagement. In an online course, this means a visual presence best delivered through videos of you speaking with your students. These videos can coney your unique perspective the same way you’d deliver them in the classroom. Students can also use the same tools and techniques listed here to provide their presence in discussion forums, assignments, etc.
One easy way to add instructor presence is to regularly record short videos. Sometimes you want to create a video for your students but have limited time. Quick videos are great if you want to provide an update to a homework problem, a project that could use a little clarification, or perhaps introducing each week’s topic with a current event. There are two ways that you can record a quick video inside your Canvas course, anywhere you can use the Rich Content Editor.
Method 1: UD Capture Express Capture
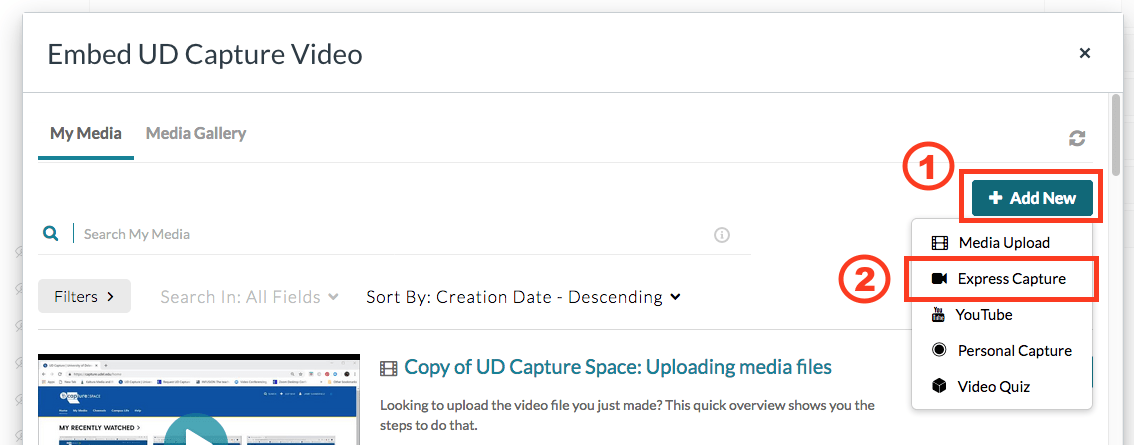
You can use the My Media tool to quickly record video from your webcam inside Canvas. And since My Media is part of UD Capture, the videos you record here get added to your My Media. This makes it easy to publish, edit, or create a quiz from in the future.
- In the rich content editor toolbar, click the Apps icon
 which looks like a power cord.
Note: If you don’t see all the icons in the toolbar, enlarge or maximize your browser window. The Select App window displays.
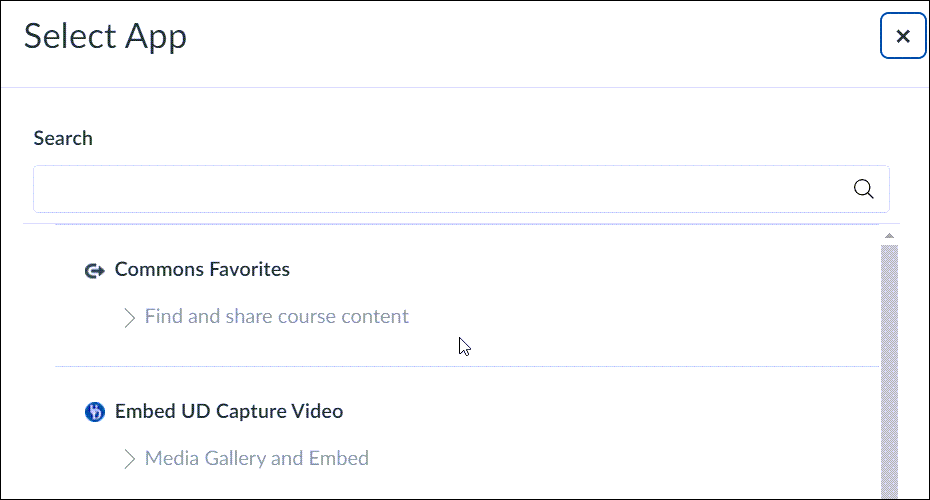
- Click the Embed UD Capture Video option. A popup displays showing your My Media and Media Gallery.
Note: After you select an app, a dropdown arrow displays next to the Apps icon so you select the app directly or click View All to select other apps. - Click the Add New button on the right and then select Express Capture.
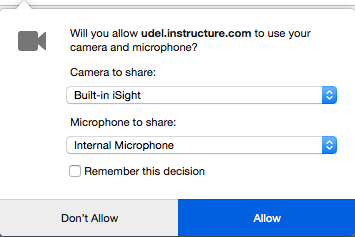
- A new window displays and your browser will request permission to access your webcam and your microphone. Select the correct device for your webcam and microphone and click Allow.
- You should now see your webcamera. Click the red circle to begin recording. A clock now shows the elapsed time. Click the square to the left of the clock to stop. Your new video will begin playing back for you to review. If you want to redo the video, click Record Again.
- When complete, click the Use This button. You can now give your new video a title, description and tags to help you locate it later.
- Click Save and Embed. A placeholder for the video will appear in your editor window. You can continue adding other content to your page such as text, images, or other videos.
- Click Save at the bottom of the page. Don’t forget to Publish the page when ready.
Good to know about this method:
- Captions will be created for this video automatically just like your other videos in My Media.
- You can re-use these videos by locating them in your My Media. You can also share these videos outside of Canvas by using UD Capture Space.
Method 2: Canvas Record Media
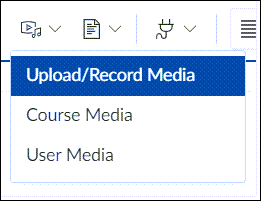
While in the Rich Content Editor, you can use the Canvas built-in Record/Upload Media on the toolbar.
- Click the dropdown arrow next to the Record/Upload Media icon
 . The icon is a rounded rectangle with a triangle inside and a musical note symbol.
In the dropdown, click Upload/Record Media. The Upload Media popup window displays.

- Click the Record tab and your browser will request permission to access your webcam and your microphone. Select the correct device for your webcam and microphone and click Allow.
- You should now see your web camera view. Click Start Recording and when complete, click Finish. You can now review your video recording. If you want to redo the video, click Start Over.
- When complete, be sure to title your video and click Save. A placeholder for the video will appear in your editor window. You can continue adding other content to your page such as text, images, or other videos.
- Click Save at the bottom of the page. Don’t forget to Publish the page when ready.

Good to know about this method:
- Closed captions are not automatically generated but you can upload your own.
- Starting on December 16, 2020, you can re-use videos created after December 16, 2020 by selecting the Record/Upload Media icon and choosing User Media. This video repository is different than your My Media and are not shared.