
 UD Capture now includes Kaltura Personal Capture, free for all faculty and staff. Personal Capture enables you to quickly and easily record your screen (and optionally a web cam) along with sound from your microphone. Once finished, the recording can be automatically uploaded to UD Capture “My Media” in Canvas or UD Capture Space to edit and share.
To get started, follow these steps.
Instructions for Personal Capture
- First, log into Canvas and go to your course, or go to UD Capture Space. Click the My Media tool.
- At the top right, click the Add New button and choose Personal Capture.
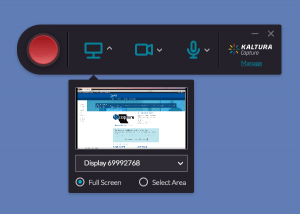
This will download the Kaltura Capture Desktop Recorder to your computer. Follow your browsers instructions to launch the application. - Using the screen icon, choose your preference for the screen or the area of your screen you’d like to record. Using the video icon, choose your preference for the optional web camera you’d like to record. Using the audio button, choose your microphone. Clicking any of these icons again will toggle their capture on or off.
- When ready, click the red record button. You will be given a 3-second count down along with a timer that shows how long you’ve recorded.
- When finished, click the gray Stop button. You will be asked to provide a title, description, and tags. Don’t skip this step! Be descriptive so you can locate your recording later.
- Click Save to save the recording to your computer. The new video should appear in the list. When ready, you can upload the recording to your My Media in Canvas. If you are doing many recordings, you may wish to queue them up for uploading at the end of your session (or in the evening if bandwidth is an issue).
- Your video will be private, viewable only by you. To share a video with your students in Canvas, publish it to your Media Gallery or embed it into a page using a module. To share using UD Capture, see these tutorials.
Tips and tricks
- Do a short test. Start with a short recording first to get the feel for the workflow.
- Clean up your desktop. Setup your desktop with everything you want to record and hide everything else you don’t want to be seen.
- Turn off notifications on your computer (Mac or PC) to prevent alerts for email, calendar, chat, etc. from being recorded. Turn notifications back on when done.
- Playing a video with sound: System audio (the sound from your computer when playing a video) is only recorded on the Windows platform. Enable this setting by clicking Manage on the right, then enable System Audio.
Note: Unfortunately, system audio is not captured on a Mac. - You can browse previous recordings you’ve made on your computer by clicking Manage.
- You can re-upload a recording by clicking the Re-Upload button.
- You can delete a recording from your local computer by clicking Delete. This will not remove the recording from your My Media in Canvas or UD Capture Space, only from your local computer.
- The recordings you create with Klatura Personal Capture are stored locally on your computer. To browse these recordings, see this guide for locating the Kaltura Personal Capture recording folder.
Reinstall Kaltura Capture
Sometimes Kaltura Capture needs to be reinstalled on your computer. This fixes many problems including being unable to start recording new sessions, unable to stop existing recordings, unable to select certain audio or camera devices, or the error message “Failed to load settings. Please contact your administrator.”
- First, uninstall Kaltura Capture.
- Macintosh:
- Navigate to the folder where Kaltura is installed. From the Finder, hit command-G. The default location for this is /Users/username/Library/Application Support/Kaltura (remember to replace username with the username on your computer)
- Locate KalturaUninstaller and double-click it. Click the Uninstall button when prompted.
- When you see the prompt “Delete all my videos and settings”, click Yes if you’ve uploaded all of your recordings to My Media. This will remove all of the videos from your local computer. If you want to save your local recordings, click No.
- Once finished, go back to the Finder window and navigate to the Application Support folder by hitting “Command-up arrow.” Move the Kaltura folder to the trash.
- Windows:
- Hit the Windows key on your keyboard, or click Start. Type “Remove Program.” When Add or remove programs is highlighted, hit enter.
- Locate Kaltura CaptureSpace Desktop Recorder and click it. On the right, click Uninstall and follow any prompts to complete the uninstall.
- Macintosh:
- Reboot your computer.
- Install Kaltura Capture
- Follow the steps at the top of the page to download and install Kaltura Capture.